Tuesday, May 18, 2021

Understanding Containerization, Using Docker - Part 1

Every technology that comes into existence is actually a solution of a problem someone wanted to solve. Containerization is no different, history of containerization goes back to 1979 as blogged by Rani Osnot in his blog https://bit.ly/3onNPy0 .

So what problem does containers solve? In context of virtualization, Containers are a solution to the two problems:-

  • With a virtual machine, you have to virtualize an entire operating system as well as the software you want to run. This makes VMs really resource heavy. The operating systems is often the single largest most resource-intensive piece of hardware on your computer and so running multiple OS's on the same computer, just so that you can have separate environments, uses a lot of your resources.
  • How to get software to run reliably when moved from one computing environment to another. This could be from a developer's laptop to a test environment, from a staging environment into production, and perhaps from a physical machine in a data center to a virtual machine in a private or public cloud.


To overcome these issues, the Linux operating system began implementing containers. The idea is simple, if you're running a Linux OS on your computer already, why run a new OS for each VM? Instead you can use the core of the OS, called the kernel, for each VM. This way the VMs only run the software that they need to.


The difficulty with this is that it is important that the VMs not be able to affect each other, or the underlying computer they're running on. And containers need to replicate this functionality. So the Linux team had to implement some safety features into the kernel itself.

Features such as being able to block off different parts of the kernel processor and memory for the different containers, so that the code running on one container can't accidentally access another container through the kernel.

Now that these containers were implemented at the kernel level, any amount of software could be run inside of one and it would be like running it in its own VM, or own physical machine. And because all Linux distros share the same fundamental Linux kernel, you can easily run containers with different distros, just as easily as you can run containers using the same distro.
The software that makes each distribution unique all runs on top the kernel and it's only the kernel that is shared across all the containers and the host OS. Once containers are implemented at the most basic fundamental part of the Linux OS, software which made it easier to implement these Linux containers begin to pop up.


One of the first and most successful container software projects is called Docker. Docker makes it easy to define, manage and use Linux containers by simply writing plain text documents to define the software that you want running inside of a particular container.

In addition, Docker and other companies began building software that could link containers together into a single app, as well as orchestrate spinning them up and down in the cloud rapidly. In addition to Docker, there are other container systems.

Let us understand Containerization(Docker's Prospective) with comparision to VM(Virtual Machine)

Figure below shows the various layers in a computer that uses VMs. The bottom layer is the hardware of your computer with the OS sitting on top of it. Next to OS is the hypervisor(software to create and run VMs). Next with using this hypervisor system can host multiple gues Operating Systems like Windows, Server, Linux etc. Each VM can contain seperate set of libraries needed by the application and each VM allocated a specific amount of Hardware that includes Memory, CPU cores, Disk Space. Thus the hardware of your system has direct impact on the amount of VM's one can host on a System and limited by hardware.


Next Figure shows how Docker fits in the picture. Instead of a hypervisor you now have a Docker engine. The Docker engine manages a number of containers, which hosts your application and the libraries that you need. Unlike VMs container does not contains a copy of the OS- Instead it shares the host's operating system.


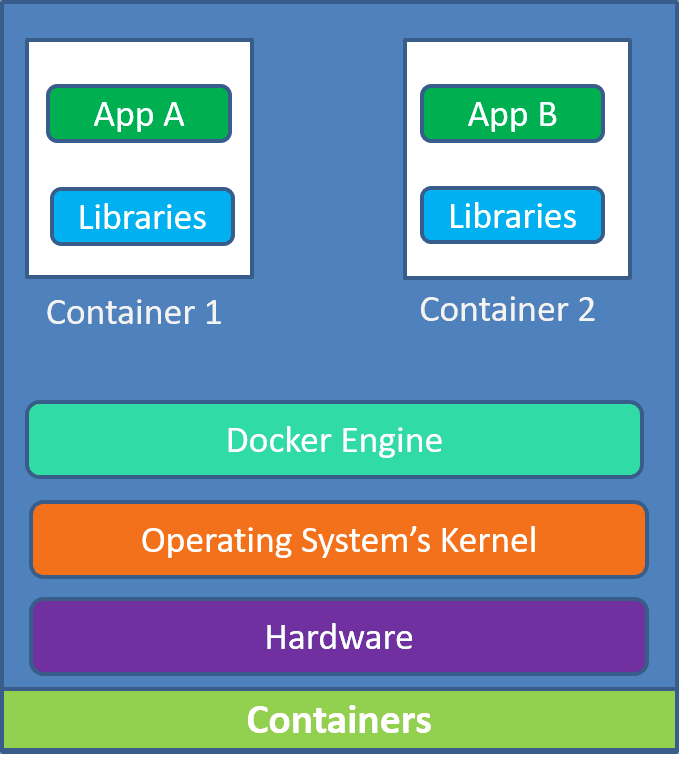
A Docker container doesn't have any operating system installed and running on it. But it does have a virtual copy of the process table, network interface(s), and the file system mount point(s). These are inherited from the operating system of the host on which the container is hosted and running.

Now before going further lets understand the most important part of Docker, the DOCKER FILE
Dockerfile is used to define a container. This Dockerfile starts with a standard image, usually provided by a software project, such as, a Linux distro or web technology like node.js. From there you can add new pieces to that image in a certain order, usually by running commands telling the image to install and setup new software. Once the file is written and saved, it can be sent in plain text to any two other people and built in just a few seconds on any computer that has Docker installed.


Once the Docker file is built, you can run the image inside a container, or copy it to multiple times, to run it in as many containers as you want. Further software can be used to network containers to each other, the same way VMs or physical machines can be networked together. So that your containers can communicate with each other to create one large system built with many small containers.


But that's just on Linux. What if you want to run containers on another operating system?


While Docker lets you run Linux containers on Mac or Windows by first starting a really lightweight Linux VM that mostly just runs the kernel, and then running all the other containers inside that VM. So this is slower than running Linux containers on the Linux, because you do have a VM, but it's faster than the old paradigm of using a bunch of VMs, because you're only running one, and you get the other benefits of containers along with it. In addition, Microsoft has been working to build Windows containers. These are containers that are built into the Windows operating systems, so that instead of running a Linux distro and a container, you can run Windows in Windows software in a container. Windows has been working really closely with Docker on this project, so they work with Docker. However, running a Windows container on Linux or Mac doesn't really work at this point.


I think this might have given enough knowledge to understand Containers, In second part of this blog series We will understand Dockers by implementing a container,and deploying application using it.

Saturday, June 23, 2018

Create Angular Application using Angular CLI

Where to start on your Angular Project? if this is the question you have then this blog will be very helpful, In this blog we will explore Angular CLI to create/bootstrap angular project. We will use VSCode Node.js, NPM to setup an Angular project using Angular CLI and later clean up some of the code and add support for Jquery and Twitter Bootstrap in the project, also will showcase how to create a component in few seconds with Angular CLI.

It is suggested to read Angular CLI documentation at the official site:- https://cli.angular.io/.

Start your angular application using Angular CLI


Open your system and follow these point step by step to learn the approach:-


  • Open your favorite Command Line tool on the system, CMDER, VSCode Terminal or Git BASH .
  • I am using CMDER http://cmder.net/, in this example. Make sure your system has Node.JS installed and npm availlable to use globally.
  • As a first thing we will install angular CLI using NPM globally.

    npm install -g @angular/cli
  • We can also specify the version after the above command to target specific version:-
    npm install -g @angular/cli@1.7.3
  • This is how it will appear on CMDER:-
  • Next in your work folder create your project by using Angular CLI command to create new project:-
  • ng new {ProjectName}

  • Here is how the output will appear after you run this ng command on your Command Line interface:-

  • It will create the Folder and code files under your workspace. 
    Note: Folder Name will be the same as of your ProjectName,

    Next, lets open this folder in your fav Code editor.

    I am using VSCode here, first thing to notice is package.json file


    • This package.json file is the one which tells npm which version of dependencies to install while generating the project. If you see closely you will notice ^ on top of version, it tells/dictates the page that atleast this version or greater than this version, we will stabilize this and keep most recent version here. so that in future if we migrate the code, there should be rights dependencies installed. If you hover on top of each setting it will tell you what is the current version available. You can leave the settings as it is if you want for always upgrading to latest ones.
    • Next, remove node module folder to re install the dependencies files, open cmder and run this command to do it:-

    • rm -rf node_modules
    • After this is done, we will reinstall dependencies by using   npm install command:-


    • Npm_modules will get back and all appropiate versions of the file gets installed.
    • Now lets modify the port to run you application on angular-cli.json file, under scripts --start, write

      ng serve --port 1200
    • /This will run when we type npm start in command line and browse the location on 1200 port instead of default 4200 port. I do this just to control on which port i want to run my application:-

    • type npm start  in CMDER as shown above it will start your application, browse https://localhost:1200, it will open your Angular Application, like this:-


     How to add external packages to the project?

    Now lets see how to add other packages to your Angular Project, we will add twitter bootstrap and as it has jQuery Dependency we will add jquery too.

    Too add Bootstrap, go to CMDER and run this command:-

    npm install Bootstrap


    • It will install all dependency files of bootstrap to npm_modules folder and as well add a refference in Package.json file.
    • Next add jQuery as bootstrap has dependency on it:-

    npm install jQuery

    And as recent bootstrap has dependency to Popper then install Popper.JS too as shown above.


    • If you would like to install specific version of bootstrap and jquery then go to package.js folder and mention the specific version and then clear node_modules and npm install like we did earlier to get specific version of jquery and bootstrap.
    • Next to use bootstrap and jquery in our current project we have to modify angular-cli.json file.

    As shown in image above, go to Styles section an in the array include the location of bootstrap css file :- "../node_modules/boostrap/dist/css/bootstrap.min.css"

    And to Scripts section in the value array put the Jquery file's path first and then the bootstrap's file's path. which is :-

    jQuery :- "../node_modules/jquery/dist/jquery.min.js"
    bootstrap:- "../node_modules/boostrap/dist/js/bootstrap.min.js"


    These paths are in respect of index.html files as eventually on that file root module and components will get registers.

    and if you do npm start in CMDER, you will see the bootstrap properties in action, just modify html file a little bit like add a container and row div.

    Generate a new component using Angular CLI.

    Its very easy to generate html template, component ts file and testing files using angular CLI, not only that it automatically registers the new component on the module. to do it you have to just type a simple command in your Command line editor:-


    • We will create component for nav-bar at top of the page. For that just use this command to generate the component:-
    ng generate component nav-bar


    CLI will perform five steps first it will create html template for componenet, next the test file spec.ts, then the component itself and then the css file and finally update the main module to register component it has creeated, you can see these changes in your folder structure:-


    You will see it has generated a new folder with the component name and respective files are automatically added to it.

    CLI generally dictates this as best practice to create each component and its respective files under a single folder, you can nest multiple components under one component, and have them communicate with each other, thats not part of this blog though.

    Lets delete the spec.ts file as its not needed as of now, i am not doing testing of anything, and just copy the code of Nav Bar from bootrstrap sample to the html template. And then add the on top of major app.component template to load the newly created nav component as shown here:-


    Thats it, you should see nav bar added on your main page Will share more magic we can do with angular cli further in my blogs, please keep following.

    Tuesday, June 19, 2018

    Connecting Visual Studio Code with your team project on VSTS using Git as version control

    Who does not love Visual Studio code, everyone does. Its not just an editor emmet, source control integration, keyboard shortcusts, json based packages, thousands of benefits. It took me time to learn how to connect it to VSTS with git, so blogging about it.

    Got to VSTS create your team project if a new one you are creating or use an existing one, also make sure to create a security token, here are the steps

    Create VSTS project and security token


    • Go to visual studio online:- https://www.visualstudio.com/vso/, login with your credentials.


    • Click New Team Project or just click an existing project, i have used Git and Scrum as VC and Work Item process.


    • Once its created, open the project and copy the HTTPS endpoint, for cloning.
    • Dont forget to create a read me and gitignore file.
    • Next lets create a security token to authenticate the repository from external tools like VS code.
    • For creating the token go to your profile and click security in the drop down :-


    • Next click ADD and create a new token:-
    • As it says please save your token from somewhere where you can reuse it as it appearonce at this interface, so i have copied it on a notepad and saved it on my desktop:-


    Add a repository using bash


    • Next if you dont have GtBash(GIT) installed on your system, then i will request you to please install it from this location: https://git-scm.com/downloads


    • Once installed open Gitbash and open the folder location where you will keep your repository by using this cd d:\{yourlocation}, as shown here:-


    • Now clone your repository by using this command as shown here:-
    $git clone {url}

    • you an either provide your credentials in the window pop up appeared or cancel it enter manual as shown here:-


    • User Name is your email address and password is the token we copied, it will clone the repository like this:-


    Connect to repository in VSCode

    • Next Open VScode and open your folder just cloned now.


    • Install the VSTS extensions if not installed allready:

    • Next, lets connect to the Team services, open the command pallete by pressing c+shift+p in VSCode as shown here :-

    • Select Team:signin command and select first option to provide a token manually:-


    • Paste your token that we copied on the notepad earlier:-
    • Press and enter the you will notice that you are connected to VSTS :-

    • Next add a new file and you will notice VS Code will tell that you have one pending change:-


    • Enter the comment and press ctrl+Enter, it will ask to stage the code before commit, press ok.


    • Your changes are committed to your local repository, now to move it to your master branch. Press sync button on below left corner:-


    • At times it may ask multiple times to enter your credentials, please add and proceed.


    • Go to VSTS site now and you can see index.html file is added to your master repository:-


    You have made it, VSCode is now connected to VSTS and Git is your version control.

    Wednesday, June 6, 2018

    Posting updates to SharePoint Online via PowerShell and Rest API

    In my previous blog office 365 powershell and restApi i demonstrated how to read/get data from SharePoint online site, here in this example we will Post updates.

    Here are the important things to consider when posting updates to office 365:-

    1. We have to pass  X-RequestDigest value for the form digest HTTP header.
    2. If updating Lists/Document Library and items/documents to avoid concurrency conflicts we need to specify additional HTTP header with the name "IF-MATCH", which takes a value of Etag. Etag can be retrieved by retrieving the target entity(list or list item) with a GET method. This is included in the response HTTP headers and in the response content. In situations where we dont care about concurrency its ok to pass "*" as value.
    I will use the PnPOnline msi PowerShell module to connect to Office 365 developer tenant of mine. Kindly read the office 365 powershell and restApi to understand how to use it and load the module.

    Lets talk about the script here.

    • First we will Import the PowerShell module.

    Import-Module "Microsoft.Online.SharePoint.PowerShell"

    • Next create a global webSession variable, we will add headers to this session via different functions as our code progresses.

    #create webRequest session global Object
    $Global:webSession = New-Object Microsoft.PowerShell.Commands.WebRequestSession


    • Lets create a function where we will pass the url of the SharePoint online site as a param and then will connect to it using Connect-PnPOnline function of PnP SharePoint Online Powershell:-


    function Init-PnPSecuritySession{
    param($targetSite)
    $targetSiteUri = [System.Uri]$targetSite
    #connect to the Sharepoint online site 
    Connect-PnPOnline $targetSite
    $context = (Get-PnPWeb).Context
    $credentials = $context.Credentials
    $authenticationCookies = $credentials.GetAuthenticationCookie($targetSiteUri, $true);
    
    #set retrieved cookies as header to wenreq
    $Global:webSession.Cookies.SetCookies($targetSiteUri,$authenticationCookies)
    $Global:webSession.Headers.Add("Accept","application/json;odata=verbose");
    
    }
    
    Will retrieve the Context from PnP web and then grab the credentials and Authentication Cookie.
    Next setup the authentication cookie value and include Accept header for content type.


    We are using odata=verbose, instead we can use odata = minimalmetadata or odata = nometadata for reducing metadata returned after the rest call.


    • Next we will write a function in which we will make a rest call to ContextInfo namespace, retrieve the RequestDigest value and pass it to websession object:-
    #function to get RequestDigest Value and set it with Http Header
    function Init-PnPDigestValue{
    param ($targetSite)
    
    $contextInfoUrl = $targetSite + "_api/ContextInfo"
    
    $webRequest = Invoke-WebRequest -Uri $contextInfoUrl
    -Method Post -WebSession $Global:webSession
    
    $jsonContextInfo = $webRequest.Content | ConvertFrom-Json
    $digestValue = $jsonContextInfo.d.GetContextWebInformation.FormDigestValue
    $Global:webSession.Headers.Add("X-RequestDigest",$digestValue)
    }


    • Now lets add additional HTTP Headers, as its an Update we will user X-HTTP-Method "MERGE" or You can use "PATCH"  along with Post so that any writable property that is not specified in the content Metadata we are passing, will retain its current value.

    $Global:webSession.Headers.Add("X-HTTP-Method","MERGE")
    $Global:webSession.Headers.Add("IF-MATCH", "*")#optional
    $Global:webSession.Headers.Add("content-type","application/json;odata=verbose")
    

    We are keeping If-Match to *, this is optional and one can ignore it in this case. Its important to mention content-type.

    • Now lets declare the content, we will use stringified JSON object to update Title of the Web here. so it should be like this:-
    $newContent = "{ '__metadata': { 'type': 'SP.Web' }, 'Title': 'PHLY CITY Site' }";
    $Global:webSession.Headers.Add("content-length",$newContent.Length)
    

    Our Object is SPweb and the property we are modifying is Title. so newContent is set accordingly and also an additional Header parameter is added to provide the content-length.

    Now lets provide our url for sharepoint site and call the functions and then finally Invoke the web request:-

    $targetSite = "https://phly.sharepoint.com/sites/phly/"
    Init-PnPSecuritySession -targetSite $targetSite
    Init-PnPDigestValue -targetSite $targetSite
    $restCallUrl = $targetSite + "_api/web"
    
    #Invoking the web request with websession and POST method.
    $webRequest = Invoke-WebRequest -Uri $restCallUrl -Body $newContent  
    -Method Post -WebSession $Global:webSession 


    Save the entire script and execute it, it will ask you credentials to login to office 365 site and then will invoke the web request. you should be able to see the updated result on the site:-


    Wednesday, May 16, 2018

    Get Projects Data using Project Server Rest API and PowerShell. Project Server 2013

    Hi, One of the requirements my team received was to extract project server related information to automate Project Servers permission for which we need to extract project server reports on daily basis.
    Its very easy and simple to use Project Server Rest API with PowerShell to extract Projects information.
    It involves three basic steps:-


    1. Invoke-Webrequest to Project server rest API endpoint.
    2. Parse the result into JSON.
    3. filter the Json result and output to excel.
    Here is the script to perform this activity

    $webRequest = Invoke-WebRequest -Uri "http://{site url}/pwa/_api/ProjectData/Projects"
     -Headers @{"Accept"="application/json;odata=verbose"} -UseDefaultCredentials
    
    $jsonData = $webRequest.Content | ConvertFrom-Json
    
    $jsonData.d[0].results | Select ProjectTitle, ProjectOwnerName, ProjectId
     |Export-Csv -Path c:\ProjectServerDataFinal.csv       
     

    And this will generate the csv file with desired input, you can get all these properties of project using basic Rest API uri and can also provide filters to as desired.

    Wednesday, November 15, 2017

    How to create File Share on Azure

    Hi, i am working with azure these days, and the first thing i did was to create my own file share on the cloud/accessible via instead of using one drive or google drive.
    So here are very easy steps to create your own cloud based shared drive on the Azure:-


    1. Login to azure portal:- https://portal.azure.com
    2. Click New and next search the market place for storage account (Use if you have any existing one)
    3. Click Create and keep settings as shown in figure below, the most important thing among settings is performance, for file share the performance have to be standard as Files storage is not available in Premium performance

    4. Wait for it to be created, next once created open the storage account and click on overview, next click on the Files in the adjacent window to open file service and click + to add a new file share:-

      One thing to note here that we can have file share size upto 5 TB i.e 5120 GB only
    5. Next click ok and we are good. to access it just open the file storage and click on Connect. You can choose the connection guidelines as per your wish, i prefer using "new use" command. Just copy the new use command and run command shell on your machine and paste the copied string and hit enter.

      Basically the string you copied is "net use [File Share Path] [User Account] [Access Key1 of Storage Account]".
    6. Just to add here, lets see the cost of creating 1 TB File Share Per Month on Pricing Calculator:-
    7. 62 Dollars plus operations cost.

    Tuesday, October 10, 2017

    SharePoint Online, PowerShell and Rest API : Introduction


    In this blog i will show you how to execute Rest API calls via PowerShell for SharePoint Online(Office 365 Tenant).

    I am using SharePoint Online PnP MSI here.

    You must have already heard about PowerShell MSI for SharePoint Online developed by Erwin van Hunen and included in SharePoint PnP, i will use the same for connecting to SharePoint online via Powershell, you can download the same using this url:-

    https://github.com/SharePoint/PnP-PowerShell/releases

    Note:- You will need to have Powershell 3.0 to use SharePoint Online msi of SharePoint PnP.

    to View all Commands in PnP, type :-

    Get-Command -Module *PnP*

    Here is the URL for help documentation for commands:-

    https://github.com/SharePoint/PnP-PowerShell/blob/master/Documentation/readme.md


    Once you have installed it, lets see how to execute Rest API calls via Powershell.

    You can use Windows Powershell ISE, SharePoint Online Management Shell, CMDER

    I am using CMDER to demo this:-

    Open CMDER and type Powershell, and then load modules:-

    If you are using cmder first time and would like to work using it with PowerShell Online, then import the module like this:-


    Now we are ready to write our Command to talk to Rest API.

    Follow these simple steps:-

    1. Connect to SP Online:-

       
      $email = Read-Host -Prompt "Please enter your tenant account email"
      $pass = Read-host -AsSecureString "Please enter tenant admin password"
      $credentials = New-Object –TypeName "System.Management.Automation.PSCredential"
       –ArgumentList $email, $pass
      $targetSite = "https://.sharepoint.com/sites//"
      $targetSiteUri = [System.Uri]$targetSite
      Connect-PnPOnline $targetSiteUri -Credentials $credentials


    2. Next retrieve the context from the connection:-

       
       $context = (Get-PnPWeb).Context
      
    3. Grab related authentication cookies

       
      #this is different object then other credentials used earlier
      $spcredentials = $context.Credentials
      $authenticationCookies = $spcredentials.GetAuthenticationCookie($targetSiteUri,
      $true)
      
      
    4. Initiate a web session and set Cookies and accept headers to it

      $webSession = New-Object Microsoft.PowerShell.Commands.WebRequestSession
      $webSession.Cookies.SetCookies($targetSiteUri, $authenticationCookies)
      $webSession.Headers.Add("Accept", "application/json;odata=verbose")
      
      
    5. Rest call constructs, here we are just retrieving data of a library with a normal get request.

      $targetLibrary = "Documents"
      $apiUrl = "$targetSite" + "/_api/web/lists/getByTitle('$targetLibrary')"
      
    6. Invoke the request

      $webRequest = Invoke-WebRequest -Uri $apiUrl -Method Get -WebSession $webSession
      
    7. Get the results

      $jsonLibrary = $webRequest.Content | ConvertFrom-Json
      
    This is how it will appear in the shell:-


    we have successfully executed our Rest Call to SharePoint online.

    To view the results you can consider d as an object and execute Select:-


    Entire PS Script:-

    $email = Read-Host -Prompt "Please enter your tenant account email"
    $pass = Read-host -AsSecureString "Please enter tenant admin password"
    $credentials = New-Object –TypeName "System.Management.Automation.PSCredential"
     –ArgumentList $email, $pass
    
    
    $targetSite = "https://.sharepoint.com/sites//"
    $targetSiteUri = [System.Uri]$targetSite
    Connect-PnPOnline $targetSiteUri -Credentials $credentials
    
    $context = (Get-PnPWeb).Context
    #this is different object then other credentials used earlier
    $spcredentials = $context.Credentials
    $authenticationCookies = $spcredentials.GetAuthenticationCookie($targetSiteUri,
    $true)


    $webSession = New-Object Microsoft.PowerShell.Commands.WebRequestSession
    $webSession.Cookies.SetCookies($targetSiteUri, $authenticationCookies)
    $webSession.Headers.Add("Accept", "application/json;odata=verbose")
    
    $targetLibrary = "Documents"
    $apiUrl = "$targetSite" + "/_api/web/lists/getByTitle('$targetLibrary')"
    $webRequest = Invoke-WebRequest -Uri $apiUrl -Method Get -WebSession $webSession
    $jsonLibrary = $webRequest.Content | ConvertFrom-Json
    $jsonLibrary.d | Select *