Thursday, November 24, 2011

Programming InfoPath Forms 2007 - Part 1(Creating the Infopath Form Project)

We all know the power of Infopath Forms, everyone simply Love them, they are sleek, easy to use and end users also finds them interesting.

But for Developers, ahh dont tell me, if you believe ---> "They are Easy to Code" and Debug with SharePoint Process w3p.exe??

Actually it is not as simple as we think, from my exeriences with this blog, i will share what i do normally.

This will be 3 parts series and in 1st part we will create the Base, "The Project containing Code".

Many of times when a newbie code with VSTA, he gets confuse how can i attach the process to debug the code and why VSTA is opening VS 2005, by default, so in this post, i will show you how can we create a VS 2008 Code Project for Infopath Forms.

With this as well we have a Case Study, which will remain there for all three Posts.

These Posts are not about designing forms, so i believe if you are reading this then you must be aware of designing Infopath Forms.

Here we will use a very simple Case Study:
  • In a Company namely "Lorem Ipsum" :).. Scrum Follows, and everyday a manager assigns Tasks To his associates, on work they have to perform, Manger uses an Infopath form, to create multiple tasks for his associates.
So Keeping this in mind, i have developed a solution simmilar.

SO Lets Look into it:

Infrastructure:
1)Team Site:We will have a sharepoint site, can take a Team Site, with Enterprise Features Activated.
2)Infopath Form Library:
We will have  an Infopath Form Library “TasksCreator”,namely .
3)Task List: For assigned Tasks we will use Default Team Site Tasks List.
Infopath Form Design:

Please follow these Points to Design the Form:
1)    Open Infopath 2007 Designer and click Design a Form Template:
 
Choose Blank from Infopath Form Template Options:
Don’t Forget to “Enable Browser Compatible Features Only”.
2)Next we will Design our Form , so that i will contain a repeating table a check box and a manager textBox like this:


Remember, we are not giving importance to the way form is designed, instead we want  to give prefference to Coding, so go ahead change the way it looks .

Details:


So here is how  My Data Source is Presently:


·         managerName: Manager’s Name-Text
·         assignTaskCheck- CheckBox Value True/False
·         Entry: Section
  • Group7: Repeating Table
·         Group1: Contact Selector
·         TaskDescription,DueDate,DateComplete
·         targetSite(V. Important) : To get the current Web url on which this form is running, instantiating SPSite object
among all of these targetSite is very important field, in this we will store the target site and use its url to instantiate SPSite object in our code..

For details on how to add Contact Selector in

Now Comes the Action Part: Coding this Form to perform our Action:

Here are the Steps we will follow to do this for us:
1)Modify Trust Level

Go To Tools in the Menu, from there go to Form Options and select “Security and Trust”, uncheck Automatically Determine Security Level and then select “Full Trust”.


2)Change The Coding Language for VSTA
I am a C-Sharper, so I will choose C#, you will find this in” Programming “ section of Form Options:


Also at a point of time if you feel that you need to remove the code, then you can do this by clicking Remove Code Button.
 
3)Make Data Connections:

Before Starting Coding we will create two Connections and Manage Submit Options,


a)Context: For Contact Selector, as you can find details in the link http://msdn.microsoft.com/en-us/library/ms558892.aspx

b)“SharePoint Library Submit”- This we will use to modify later with our code to submit our form in the library, for now just create it as follows:
Go to Data Connections then select "To Submit Data to Document/ Form Library"

For Now just Give any Form Library in the Site, later we will modify it using code.


I have Given File Name with a Format: concat(managerName, "-form", today())
you can choose different way, and do check Allow Overwrite if file exists. That’s it finish it by doing next twice.

4)Enable Submit Options:

Go To : Tools in Menu, Submit Option and Configured as below, choose Perform Custom Code action,


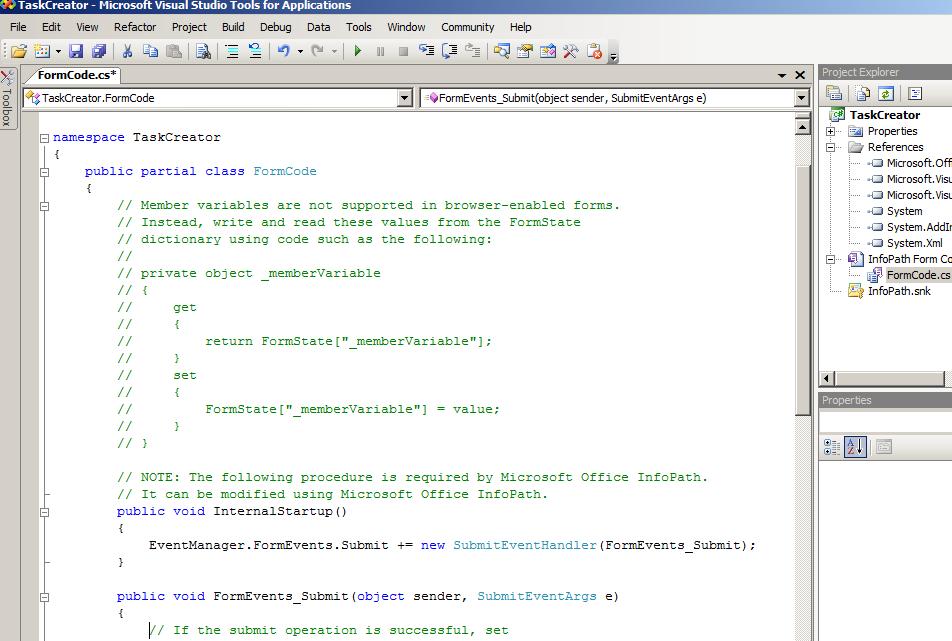
Press Edit Code. Save the form if its prompted and then it will open VSTA -2005 Code for you in VS-2005 Environment,


Don’t do anything now just Save it, and if asked , press ok in the submit Options in Infopath Designer and Save the code .


5)Now Lets Convert Our Code in the VS-2008 Code.

Go to the Infopath Designer click on Submit Button and in Button Properties in Action Drop Down Choose Submit, and that’s it. We are now ready with coding work. Save The Form.


Close the VSTA , VS 2005 project, do copy the directory path of it, and open then open VS-2008.Or Just Change the Location of the Project and then open it in VS2008, It Will ask you to Upgrade the Project, Please do that and that’s it we are done with it.
It Will Get Upgraded, Now Close The Project.


* Save  Form as Source Files:
Next, we will Extract the Form Source Files and save it in a Folder as “Infopath Form Template” Open the Form in Infopath Designer 2007, Go to File then choose Save as Source Files.


NOTE: Please Do Follow the Same Name of the Folder as we have choosen.

Now Copy that Folder and Place in the Project that we upgraded above at root.

* Open the Project in VS 2008.Open the project again and “Click show all files”, then you will be able to see Infopath Form Template folder, include the folder in the project.


Rebuild The Project, and you can see pdb and dll created in the same folder.

If .pdb files are not created then check if the Project is in Debug mode and Debug Config should Be Full.

For this , go to Project Properties, their select “Build” and from there choose Advanced option in the lower right corner, and in output for Debug Info Change Drop Down Value to full, see below:


Save the Project and Now we are ready with the upgrade and its finally a Infopath Form SharePoint Compatible VS-2008 Project. You can now see that VS 2008 contains all Designer Menu Items and Options.

Data Source and rest of Properties are enabled in the same VS2008,

Open Manifest.xsf file in Infopath Form Template Folder, so here we have over Designer Enabled here in you can see the form right there in VS2008.:


Go To Second Part of this Blog to see how to do coding  with this  to achieve our Case Study.

  • It Contains a Manager Name Text Box(We will use it for Naming the Form), as per logic it contains name of manager who will assign multiple tasks to his associates.
  • "Assign Action Item" Check Box, If Checked then our repeating table will get appear and manager can create multiple Tasks in it , it will look like this:

Wednesday, October 19, 2011

Record Center 7089 error, Access Denied while creating SharePoint 2007 acess Denied

Actually, my client has asked me to do some fun with OfficialFile.asmx service,wwooooh i was thinking for it self quite .

But on his site collection when i tried to create a record site, first i got access denied error but later i checked site was created but it was doing nothing..Strange

And then i went into more details and Got the main reason of this error:

How i resolved the problem.:

•First i tried to activate Office SharePoint Server Publishing Feature(requirement of Record Site Template)..//Got access denied error

•Then after doing some Bing Search, i got a STSADM command which resolved my issue, i have to activate Publishing Resource at my Site Collection level, and this what i did:

•C:\Program Files\Common Files\Microsoft Shared\web server extensions\12\BIN>

stsadm -o activatefeature -name PublishingResources -url http://website


Note that we are activating Publishing Resources at the Site Collection.

That was it then when next i went to activate Publishing feature it let me to do that perfectly and later i was able to create a Record Centre Site without any problem.....

Monday, August 29, 2011

SharePoint 2010 Workflow using Visual Studio 2010

In My previous posts I have taken a developer approach to prescribe the things to go for while developing some custom SharePoint solutions, but here Iwill show one by one every step to achieve this. You’re about to witness an evolution in building workflows for Microsoft, no need for command line deployment, specific configuration of workflow features, and dealing with workflow and feature xml files.


What I’m about to show you is what I did and tested in the following environment:
• Microsoft Windows server 2008 R2 Enterprise Edition

• SharePoint Server 2010 Enterprise Edition

• MS SQL 2008 Enterprise Edition

• Visual Studio 2010 Ultimate

• Code was done in C# only

(Note: we don’t need the exact environment, but as such a similar one to get started)
1. In your SharePoint 2010 create a Document Library (unless you already have one) which can be easily achieved by choosing “New Document Library” from the “Site Actions” menu (located in the top left corner) ,give it a name “Here I have Given: Tax Reports” and click “Create”.
Now you need to create a mock contract template in Word 2010 for your Document Library

2. When in your Document Library, click the Library Settings in The top Ribbon under Library Tag.

3. On the Customize Documents page, locate the Columns section.

4. Create a Employee custom column:


o Click Create Column.


o Type in the column name: “Employee”.


o Select the type Single line of text.


o For the “Require that this column contains information setting” click Yes.


o Click Ok to add the new column.

 5. Add two more columns: a “Employer” column that is type Single line of text and a “TaxAmount” column that is type Currency. Both columns should be required.


6. Return to the document library home page.

7. Under Library Tools, extreme left select “New Document” and create a document.

8.       A new document appears in Word 2010,choose “Enable Editing”. Go to File and observe that there are text boxes for the custom columns from the document library:


9. On the Office menu click Save As. Save the document as %PATH OF YOUR CHOICE%\Contract.docx. If you are prompted to confirm saving to the new Word 2010 file format, click “Ok”.


10. Insert content controls for each of the server properties:
o Place the selection in the document where you want the content control to be placed.
o Select the Insert tab on the ribbon.
o Click Quick Parts, then click Document Property, and then click “Emplyee”.
o Repeat these steps to add content controls in the document for the Employer and the Tax Amount properties.
o For now, leave the content controls empty – do not add text to them.

11. On the Office menu, click Exit Word. When prompted to save changes to the document, click “Yes”.


12. Return to the document library in Internet Explorer, click Settings and then select Document Library Settings.


13. On the “Customize Documents” page, locate the “Content Types” section and click the Document link.

14. NB. If you can’t locate the “Content Types” section, in the “General Settings” section locate “Advanced Settings” in there switch the radio button under “Allow management of content types” to “Yes”, now when you come back to the “Customize Documents” page you should be able to locate the “Content Types” section.


15. On the “List Content Type: Document page”, click the “Advanced Settings” link.


 16. Select the Upload a new document template radio button and then click Browse. Browse to select %PATH OF YOUR CHOICE%\Contract.docx and then click Ok.

17. In Internet Explorer, return to the document library.


18. Upload a new document:

o In the document library, click the “New Document” Library Tools and then click “Document”. Word starts and loads a new document based on the contract template you created.
o Fill in the values for Title, Employee, Employer and TaxAmount. You can fill in the values on the document properties bar (just below the ribbon) or you can fill in the content controls: the end result will be the same.
o Once all required fields have been filled in, on the Office menu, click Save.
o Save the document with a filename of your choice to the document library. If you receive a message that the document must be checked in for it to be visible to others, click OK.
o On the Office menu, click Close. When prompted to check in the document, click “Yes”.
o In the Check In dialog, click Ok to accept the version defaults. Exit Word.
o Your new document appears in the document library. Notice that the Employee, Employer and TaxAmount columns reflect the values you entered in the Word document.


19. You may upload additional documents if you wish.


20. Close Internet Explorer.

Now comes the fun part, creating the workflow itself


21. Start Visual Studio.

22. On the File menu, click New and then click Project. The New Project dialog appears.

23. In the list of Project Types, expand SharePoint select 2010.

24. Select the Sequential Workflow project type.

25. Name the project TaxWorkflow, specify the default location and click “OK”.

 
26.   The New SharePoint Workflow wizard appears. Change the workflow name to TaxWorkflow, use your local site where you created your Document Library (eg http://localhost/yoursite) for debugging and click “Next”.
27. Select ListWorkflow and press next, and then choose the default debug setting and library to associate workflow with

Note: If History, Task List is not presented it would not let you create the workflow, please create Task lIst in case of a blank Site template.


29. The new workflow appears in the designer.


Add a CreateTask Activity to the Workflow


30. If the toolbox is not displayed, then on the View menu, click Toolbox.

31. From the SharePoint Workflow tab on the control toolbox, drag a CreateTask activity and drop it onto the workflow designer between onWorkflowActivated1 and the end of the workflow ( ). The new activity is named createTask1 by default.


32. Configure the TaskID property of createTask1:

o In the Properties window, click the ellipsis for the value of the TaskID property. The Bind ‘TaskID’ to an activity’s property dialog appears.
o Type the new member name myTaskId, ensure that the Create property radio <>button is selected and click OK.


33. Configure the TaskProperties property of createTask1:

o In the Properties window, click the ellipsis for the value of the TaskProperties property. The Bind “TaskProperties” to an activity’s property dialog appears.
o Type the new member name “myTaskProperties”, ensure that the Create property radio button is selected and click OK.

34. In the properties window, select the MethodInvoking handler. Type MyTaskCreation and press the Enter key. The code window appears.

35. Add code to the MyTaskCreation event handler and also add the CustomFieldText function.


36. On the View menu, click Designer to return to the workflow designer.


37. In the Properties window, select the text box for the CorrelationToken property value. Type myTaskToken and press the Enter key.

38. Expand the CorrelationToken property to display the OwnerActivityName subproperty.

39. For the OwnerActivityName subproperty, select Workflow1 in the dropdown.

Add a While Activity to the Workflow

40. If the toolbox is not showing, then on View menu, click Toolbox.

41. Drag a While activity and drop it between createTask1 and the end of the workflow ( ). The new activity is named whileActivity1 by default.

42. In the Properties window, locate the Condition property for whileActivity1.


43.   Select Code Condition in the property value

44. Expand the Condition property to display the Condition subproperty.

• 1. For the Condition subproperty, type myTaskNotCompleted and press the Enter key. The myTaskNotCompleted event handler appears in the code window.
• 2. In the Workflow1 class, add the taskCompleted variable at the class-level.


 • 3. Add code to the myTaskNotCompleted event handler that will return a result indicating whether or not the task has completed; the task is completed when its PercentComplete property is 1.0.


Add an OnTaskChanged Activity to the Workflow

48. On the View menu, click Designer.

49. If the toolbox is not visible, then on the View menu, click Toolbox.

50. From the SharePoint Workflow tab on the toolbox, drag an OnTaskChanged activity and drop it in the center of whileActivity1. The new activity is named onTaskChanged1 by default.


51. In the Properties window, set the CorrelationToken property of onTaskChanged1 to myTaskToken.


52. Set the AfterProperties property of onTaskChanged1:

o In the Properties window, select the ellipsis for the AfterProperties property.
o On the Bind ‘AfterProperties’ to an activity’s property dialog, select the Bind to new member tab.
o Name the new member afterMyTaskPropertyChange, ensure that the Create Property radio button is selected and click OK.

53. Set the TaskId property of onTaskChanged1:

o In the Properties window, select the ellipsis for the TaskId property.
o On the Bind to an existing member tab, select the myTaskId property and click OK.

54. Double-click onTaskChanged1 in the workflow designer. The Invoked event handler for onTaskChanged1 appears in the code window.

55. Add code to onTaskChanged1_Invoked that will set the taskCompleted variable to true when the PercentComplete property of the task is 1.0.


56. In the Workflow1 class, set breakpoints on the MyTaskCreation and onTaskChanged1_Invoked methods.

Note: To set the breakpoints, select the first line of each method in the code windowand press the F9 key.

57. Press F5 to start debugging the project.

Note: Watch the output window as the project is built and deployed. The output window shows you many of the steps that VSTO takes for deploying the workflow solution - without VSTO, these are all steps that you would take manually. One of the SharePoint requirements for a new workflow solution is that the SharePoint worker process and IIS must be restarted; thus build/deploy times may vary.


58. Internet Explorer starts and displays the document library with the document(s) that you uploaded.

Note: You might encounter the following warning (below), if you do, click “No” do as it said and start again.


59.   Next Just upload a new document and will able to see the current progress:
60.   Then go Tasks List.


61.You can see a new task created above.


Go Ahead and Edit the document and you can see the status as above.

Just make it 100% complete.


And you can see that TaxWorkflow Completed...


Monday, July 11, 2011

CLAIMS BASED AUTHENTICATION in SharePoint 2010

Authentication??

Authentication, in simple English, we say “The Person is Actually the one what he/she claims to be”.

Like in Famous James Bond Series, if Black Suited, Maybach Driving guy says to you, HI I am Bond , James Bond, will you seriously going to believe him, until or unless you see his ID or “Solid Action” the same thing implies with Technology, and we have to provide a way to our websites, so that  system can authenticate this is the James actually trying to Login the Site.
Microsoft Provides for example Active Directory, in which we can create rules belongs to person and Groups and let the system recognize the access accordingly.

Suppose if James tries to login to our site and he is member of 007 Active Directory and yes it does have access to our site, so James will get access. Till the time our site is running on the basis of Active Directory to which all users of site belong we will have no issue,we don’t need Claims Based Authentication in this .

but this is not the case in General.

So where does requirement comes:


1. Sometimes Rules, Company Laws, etc doesn’t allow to capture everything and publish on the sites, means we cannot ask a user to provide all his personal information and place it on an open internet site.
Example, why a girl who is actually a lady but doesnt look too aged, like to reveal his age to anyone.

2. We work in a Network Environment, where Business Communicates with Other Business and not everyone does have the same Active Directory Authentication and even if they have then it might not be necessary that it will have the same instance of “AD”, Still organization like to provides maximum integration facilities to its users.

So here we go with Claims Based Authentication, it addresses the above challenges.

It addresses privacy and ask very less personal Information from the user and by trusting other parties or systems to do the “proof of identitycheck.

So what does Claims Based Authentication do?

Suppose we have to create a site for a “Pharma Company” which sales its medicines worldwide, called xyzPharma.

But hold on Before implementing authentication, we need to make sure that are we implementing the thing which will pass legal laws of Global Countries, take for example in U.S there are many Supplements/ Shampoos or even drugs which are banned but they are legal in Some other company, so if we have to make this implementation cut to clear then how can we do it, answer is very simple ”Claims Based Authentication”, at the same time we need not to ask who actually the person is,!


It turns out that in the country, the Government has set up a web service that users log on to, which authenticates them based on their citizenId and citizenPassword. It then is able to tell other systems that a user is their country citizen or not, without revealing who that user is.

So we implement our “xyz pharma” website by building a claims-aware system. Instead of building the standard “username and password” login mechanisms, we simply ask the Government’s web service to tell us if the user browsing our site is of which country. The claim that our system uses is a “userCountry” claim, and the claim value is either yes or no. We simply don’t build any authentication system at all beyond a simple “if (userIsofCountry) then..“ statement.


By doing this, we address privacy concerns – we don’t know or keep personally identifiable information – while at the same time ensuring that we don’t sell drugs to someone where it is banned.

Claims Based Authentication:


It actually integrates the different systems by allowing communication via open standards and does provide platform to develop more specialized “identity connectors” between systems.


How is it implemented?

The claims-based authentication implementation has a number of components. In simplified terms here’s how the pieces of technology fit together.

• From a developer’s point of view, the platform that Microsoft is providing is called the Windows Identity Foundation. This used to be called the Geneva framework. It provides a programming library suitable for building claims-aware applications. This library is also used by SharePoint 2010.


• Active Directory Federation Services implements services to create, accept, and transform tokens that contain claims.


• Cardspace provides a user interface for users to select which “identity card” they wish to use for a particular system


For More details read this very good article on Claims Based Authentication:
Claims Based Authentication-Part1

Thursday, May 26, 2011

How To add a pdf icon in Sharepoint sites

So, Why not pdf icons are included in sharepoint?
Let the answer be unspoken.
but how to add that, so when we create a doccument library, icon will appear when we upload a pdf file?

So here we go with steps.

1)Copy pdf_smallicon from adobe site.
2)Open 12\Template\Images folder
3)Paste it in that.
4)open Docicon.xml file which is over here : 12\Template\XML\Docicon.xml
5)Go to tag
6)Add this


7)Thats all, go ahead upload any pdf file now and see the magic...

LINQ to Sharepoint 2010.

LINQ (New Data Access Paradigm), when i hear it for the first time, i was sitting in a seminar and dotnet geeks were giving long lectures on it.It will make developer's life more easy.....

LINQ is a new data access paradigm which allows users to express SQL like syntax against a variety of data sources. LINQ can improve performance by allowing the back end data source to decide the best way to solve the query.
Was Amazed when used it in 2007 days for filtering CAML returned data.

CRUDQ options were allready there for maiking things good for us. but still there was something easy to implement was missing.

And finally with 2010 Microsoft given us LINQ to SharePoint.
Namespace Microsoft.SharePoint.Linq.

For people who are wondering , what is the use of it when we have CAML and more things availlable.

So for those the answer i have is its very fast, Even perform all CRUDQ options, you can bring data from multiple List and as well its very easy to write and intelliscence support we have for gettting the column names and more of the things for which we struggled alot in past looking deeper in internal names of the columns ows_xyz...

SharePoint now fully supports LINQ for querying lists so that you can query information from the platform in a more condensed, easier to understand format.


SPMETAL, the new command line utillity we have for providing the basic structure for LINQ.

In this Post i will be sharing my own experience of working with it and using LINQ to SHAREPOINT.

Writing LINQ queries are very easy but tricky things comes with SPMETAL generated code and how to use SPMETAL utillity and usage of Parameters.xml as parameter file in the command line and as well the way of utillizing the data fetched by LINQ query on EntityList.

First we will take the brief on how LINQ does the Processing(building CAML in the background and then we will come to SPMETAL and way to create the code using Parameter.xml and also i will take the case what if some fields doesnt appear the code file,how to do hard fixing(the term i normally say) )

Next i will explain, how to query with scope recurssive when querying Document Library for Folders.

In the end i will explain how to bind the data to a GridView with Template Columns to the Ienumerable list of data returned by LINQ query.

Monday, February 14, 2011

MOSS to Sharepoint 2010 site Upgrade

Hello Folks Now as we have SharePoint 2010, most of us are looking forward to upgrade their present Moss site to their new SharePoint 2010 farm, this blog of mine will represent that only:

Just follow these steps:

Requirements
Before we Begin to do this amazing task let us discuss our requirements:
1) SharePoint Server 2010.
2) SQL Management Studio 2010.
Also the requirement is that the MOSS or wss site from which we are going to migrate to 2010 should be hosted in a farm with SP2 Upgrades of respective versions.

Initial Preperation
Following are the tasks which we are going to do here:
1) First take the Backup of MOSS/WSS hosted web application using SQL Management Studio 2005.
Remember we have to be very concise about naming of the backups, it should be consistent and same, with what is there right now, that’s why with MOSS SDK , Microsoft suggests:” please do change the name of Content Database while creating a web application”. See Below the best practice for creating a web application:


NOTE: we are migrating whole web application, so whatever sites will be there in web application will get migrated as well.
This is application Based migration.

•Taking Backup(on MOSS/WSS Farm)


For taking back up follow these steps:
1) Go to Microsoft Sql management studio 2005, open the relative Sqlserver instance and then look for the “WSS_Content_31477”, which we created specifically for this application.


After restoring the database, Now provide the Web Application’s application pool Identity user “dbo.owner” rights for this database.

•Creating a Web Application in 2010
Now we will create a web application and on this application we will attach our WSS_Content_31477 database.
Go to central admin, create a new web application, please name the content database keeping in mind that we have to remove this later.
Go to manage applications and create a new web application:


Now we will delete its current database and attach our own database,
For doing that go to manage content database and select the current web application


Click on this particular database, Make the status to OFFLINE:


And press ok with Remove content database selected.
Now we have done with our detaching of database, now we will add our database to this web application using Powershell.
Open Sharepoint Powershell command prompt.
And write this command:

Mount-SPContentDatabase –Name WSS_Content_31477
–WebApplication “http://nameofwebapplication:port/

A timer will start:


Which will display the current status of attaching wait once it get 100%.

When everythings goes fine then it will show follow screen with 100% status


Now its time to change the Site Administrators, WHY?Farm is new so could be possible we are at new Active Directory or Administrator could be Domain Specific, if your active directory is same then need not to worry about this section

For changing the Site administrators , In application management go to change site administrator and assign new administrators for this application.


Now its time for the Main action open your site collection in the web application.


Enter the credentials of the new administrators and here we go…

Now a surprise will comes to you, You will see the same 2007 site in 2010 with exactly same look and feel,


this is not what we require, So what to do next, for this go to next section : Visual Upgrade.

But the good thing was that everthying work exactly the same:

Search Working like it works in moss and everything was fine. Lets see if it remains same in next step:


•Doing Visual Upgrade
Now we will bring 2010 on it.
1)We will bring Ribbon and 2010 feel.
2) If necessary we will change master page config
3)We will cross check the functionality.


Now go to site actions and then site settings


And then press Visual upgrade right below


And Update all sites, and that was it.

HURRAH…We Done IT..Finally: