Showing posts with label LINQ to SharePoint. Show all posts

Monday, March 12, 2012

Creating Custom Workflow Activity using Visual Studio 2010 for SharePoint 2010 (SharePoint A to Z Series)

Hi, since long i was thinking to blog about this topic and finally got a chance to do so. Normally we prefer to create Designer Based Workflows, as they are easy to create, manage and quite flexible.

But still at situations Designer Workflows not allow us to do certain Tasks, for an instance , performing cross site Tasks, like Creating a Document Library in a different site or Creating a new site on certain conditions.
Instead of Creating Complete Workflow we can still use Custom Activities Development in Visual Studio 2010 which is much easier to built and easy to manage for client's Power Users.

So what  i mean is simple “Code an Activity” instead of Coding a Complete Workflow.
Now lets come to the point and follow some steps to create a simple Workflow Activity. Remember this will be Number 1, and quite easy one, later i will post some bigger and much cruciall Activities.
What I’m about to show you is what I did and tested in the following environment: 
• Microsoft Windows server 2008 R2 Enterprise Edition
• SharePoint Server 2010 Enterprise Edition
• MS SQL 2008 Enterprise Edition
• Visual Studio 2010 Ultimate
• Code was done in C# only
(Note: we don’t need the exact environment, but as such a similar one to get started)

Step: 1) Create a Project to support Activity Deployment to Farm

Create an Empty Project in VS2010 and Name it “CustomActivityDemo”, make Sure it should be a Farm Scoped Project.(No SandBoxed), And select the site on which you like to test it /*Empty SharePoint Project*/

Next Click Finish.. It will be just like a scenerio where this project will act as a Rocket Launcher for our Rocket(Activity).. :)
We will setup code and properties later in this, now lets move ahead and create our Activity Project in the Same Solution.
Step :2) Create WorkFlow Activity Project
At the Solution level Right Click and “Add a Project” in VS2010.
Next  Select the Visual C# >Workflow >Workflow Activity Library and set the project name as ‘CreateSiteActivity’.
Now whole solution will appear like this:
Note that after adding Workflow Activity Library Project  a Design view of Activity appears which shows Activity1.cs
lets now follow these subpoints:
• Right click the Activity1.cs and rename it to “CreateSiteActivity.cs”,


• Again Right Click “CreateSiteActivity” and click “View Code”.


• Now add a reference to
 Microsoft.SharePoint.dll and  Microsoft.SharePoint.WorkflowActions.dll   located in ISAPI Library:

• Import the following NameSpaces in the code file:


This will how the code will appear now:
Before going further lets discuss some of the important terminologies:

 
Step :3) Some Introduction to WorkFlow Terminologies:
This will be boring a bit but very quickly please do read these lines as it will clear our process in a bigger way:

Dependency Property
Dependency properties provide a centralized repository of a workflow's state.
The DependencyObject is a hash table that stores the current values of any DependencyProperty that is applied to it.

Dependency Object Class:

An instance type of a dependency property can be bound to instance data, in which case the actual value is not determined until runtime.
You set this type of dependency property's value to be an ActivityBind to bind to the actual value that is accessed at runtime.

ActivityBind binds an activity property to any of the following:
• Another activity property.
• A field.
• A property.
• A method.

In Simpler Word:

Dependency Property provide a mechanism that allows SharePoint Designer to provide values for your custom action before you add your custom functionality.

To allow SharePoint Designer to pass values to your custom action when the workflow runs, you must create public properties inside your custom action. In this example, you will create a custom action that will create a new site within SharePoint whenever executed inside a SharePoint Designer workflow.

Before Writing any Dependency Property and its Binding Property, we have to think about our Inputs, so in this example here are the inputs:

SiteUrl: Where the site will be located.

SiteTitle: Title for the new site.

SiteDescription: Description for the new site.


SiteTemplate: Template to use to create the new site.

InheritPermissions: True, if the new site will inherit permissions from its parent site.


For each field, you create a property in your custom action to allow the users to specify these values when designing their workflow in SharePoint Designer.

When creating properties for a custom action, you create the property itself and a matching DependencyProperty. The DependencyProperty class allows SharePoint Designer to bind the property to the UI in the workflow wizard, where the user specifies the values of these properties in the workflow being created.


Note: Please follow the Syntax we will use while Creating a Property and a Matching Dependency Property, there is Matching Relation require in both of these Names.

Add the following code to create a property and DependencyProperty for SiteUrl:

Parameters it takes are : 1)String Name of the associated Property, Type of Property, Type of Owner(Activity Class Name)


Now for a while just think on what we have written:

Dependency Property Name : SiteUrlProperty and Matching Property Name is SiteUrl
It is required to follow above Syntax i.e always write Dependency Property with Suffix “Property” if you miss this then you will get Compilation Error.
Step: 4) Getting Current Workflow Context


Step:5) Complete Rest of Dependency Properties Simmilarly

simmilarly complete the Dependency Properties for rest of inputs we discussed earlier and code should now look like this:

Step:6) Execution of Main Action

Whenever in Workflow the pointer reaches to the Activity then There is an entry method which executes and this method/function is Execute :


We need to override this function to write the functionality of our activity:

This function returns an ActivityExecutionStatus which is an enum containing values. And takes executionsyntax as parameter.


For getting refference to current site , we will use _Context property that we defined above


Step:7) Code to insert in Execute Method:


Note: If an error occured then we have used ISharePointService to logtohistory list whatsoever error occurs.

Step : 8) Create ACTIONS file

NOTE:Before reading the next lines first Sign the Assembly and run "sn.exe -T 'Path to Dll'" command to get the PublicKeyToken Value of CreateSiteActivity.dll

Next Step is to Create an Action File, this file is require to tell Designer how the Activity will appear in UI to the USER, this will make the custom activity to appear in the Wizard.


An ACTIONS file is an XML file that is used by SharePoint Designer's workflow wizard to provide a user-friendly experience for configuring actions. Every action must be configured in an ACTIONS file before it can be used in SharePoint Designer. By default, there is only one ACTIONS file, located at


{14 Hive}\TEMPLATE\1033\Workflow\WSS.ACTIONS, and it contains an entry for each of the built-in actions in Windows SharePoint Services.


for a complete refference of this file please visit this msdn article:
http://msdn.microsoft.com/en-us/library/bb897811.aspx

Step:9) Deployment Process

Deployment Process Consists of Four Sub Steps:


1)Sign The Assembly and Get The Public Token and place it in the ACTIONS file:

Right Click “CreateSiteActivity” Project and then go to Properties and then in “Signing”, create a new key name it “CreateSiteActivity”, then BUILD the Project and later Sign the assembly using:

Sn.exe –T “path to CreateSiteActivity.dll”

Note the PublicKeyToken and modify the Actions file accordingly.

2)Place the ACTIONS file to the Worklfow Mapped Folder of SharePoint 14 Hive:


In the CustomActivityDemo project Add a SharePoint Mapped Folder to Template /1033/Workflow

i.e{SharePointRoot}/Template/1033/Workflow and save the above ACTIONS file, with ACTIONS as extension.

3)Deploying CreateSiteActivity DLL to GAC and Create Safe Control in Web Config of the Web Application.


1)Expand the Package Item in the CustomActivityDemo Project,


Then double click it, which will open the Package properties then click Advanced.

 click Add. And select Existing Assembly:
Add Necessary Information to add safe control, when complete it will appear as this:

4)Add Authorize Type in web config

To do this, we will include a feature in sharePoint Project: "CustomActivityDemo" (The Rocket Launcher) Project, Name it something Suitable and Scope it to WebApplication:
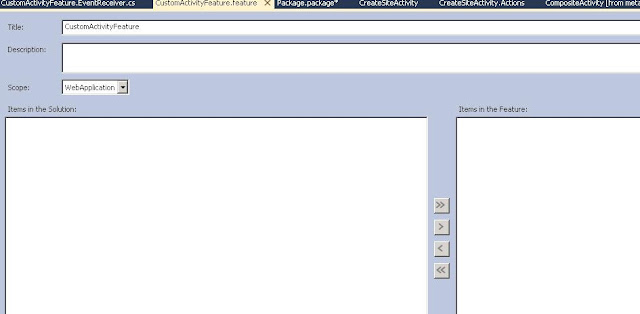


Then right click the Feature and Add a Reciever:
Add using Microsoft.SharePoint.Administration Namespace to its code file
Uncomment Feature Activated Block.
As scope of the Feature is SPWebApplication , from properties take the instance of feature parent as spwebapplication:

If you see the properties of SPWebAPPlication Instance then you can see a collection WebConfigModifcations:

Now we have to add a new webconfigmodifcation to this collection , to do so create an Instance of SPWebConfigModification class:


SPWebConfigModification modification = new SPWebConfigModification();


Now we will initiate these properties of Modification:


Entire Code will appear as this:


Next Build, Package and Deploy your solution.

Step: 10) Test the new Action
Next open the site which we used for testing this project in SharePoint Designer and Create a New List  Workflow  on any of List (take Task).

And in List Actions you can see our newly created activity:

It will Work as it did at my end. Please test yourself and use it in your daily workflow cycle.

Hope it will help and Workflow Activities creation will be now a simple process for you all.

Thursday, November 24, 2011

Programming InfoPath Forms 2007 - Part 1(Creating the Infopath Form Project)

We all know the power of Infopath Forms, everyone simply Love them, they are sleek, easy to use and end users also finds them interesting.

But for Developers, ahh dont tell me, if you believe ---> "They are Easy to Code" and Debug with SharePoint Process w3p.exe??

Actually it is not as simple as we think, from my exeriences with this blog, i will share what i do normally.

This will be 3 parts series and in 1st part we will create the Base, "The Project containing Code".

Many of times when a newbie code with VSTA, he gets confuse how can i attach the process to debug the code and why VSTA is opening VS 2005, by default, so in this post, i will show you how can we create a VS 2008 Code Project for Infopath Forms.

With this as well we have a Case Study, which will remain there for all three Posts.

These Posts are not about designing forms, so i believe if you are reading this then you must be aware of designing Infopath Forms.

Here we will use a very simple Case Study:
  • In a Company namely "Lorem Ipsum" :).. Scrum Follows, and everyday a manager assigns Tasks To his associates, on work they have to perform, Manger uses an Infopath form, to create multiple tasks for his associates.
So Keeping this in mind, i have developed a solution simmilar.

SO Lets Look into it:

Infrastructure:
1)Team Site:We will have a sharepoint site, can take a Team Site, with Enterprise Features Activated.
2)Infopath Form Library:
We will have  an Infopath Form Library “TasksCreator”,namely .
3)Task List: For assigned Tasks we will use Default Team Site Tasks List.
Infopath Form Design:

Please follow these Points to Design the Form:
1)    Open Infopath 2007 Designer and click Design a Form Template:
 
Choose Blank from Infopath Form Template Options:
Don’t Forget to “Enable Browser Compatible Features Only”.
2)Next we will Design our Form , so that i will contain a repeating table a check box and a manager textBox like this:


Remember, we are not giving importance to the way form is designed, instead we want  to give prefference to Coding, so go ahead change the way it looks .

Details:


So here is how  My Data Source is Presently:


·         managerName: Manager’s Name-Text
·         assignTaskCheck- CheckBox Value True/False
·         Entry: Section
  • Group7: Repeating Table
·         Group1: Contact Selector
·         TaskDescription,DueDate,DateComplete
·         targetSite(V. Important) : To get the current Web url on which this form is running, instantiating SPSite object
among all of these targetSite is very important field, in this we will store the target site and use its url to instantiate SPSite object in our code..

For details on how to add Contact Selector in

Now Comes the Action Part: Coding this Form to perform our Action:

Here are the Steps we will follow to do this for us:
1)Modify Trust Level

Go To Tools in the Menu, from there go to Form Options and select “Security and Trust”, uncheck Automatically Determine Security Level and then select “Full Trust”.


2)Change The Coding Language for VSTA
I am a C-Sharper, so I will choose C#, you will find this in” Programming “ section of Form Options:


Also at a point of time if you feel that you need to remove the code, then you can do this by clicking Remove Code Button.
 
3)Make Data Connections:

Before Starting Coding we will create two Connections and Manage Submit Options,


a)Context: For Contact Selector, as you can find details in the link http://msdn.microsoft.com/en-us/library/ms558892.aspx

b)“SharePoint Library Submit”- This we will use to modify later with our code to submit our form in the library, for now just create it as follows:
Go to Data Connections then select "To Submit Data to Document/ Form Library"

For Now just Give any Form Library in the Site, later we will modify it using code.


I have Given File Name with a Format: concat(managerName, "-form", today())
you can choose different way, and do check Allow Overwrite if file exists. That’s it finish it by doing next twice.

4)Enable Submit Options:

Go To : Tools in Menu, Submit Option and Configured as below, choose Perform Custom Code action,


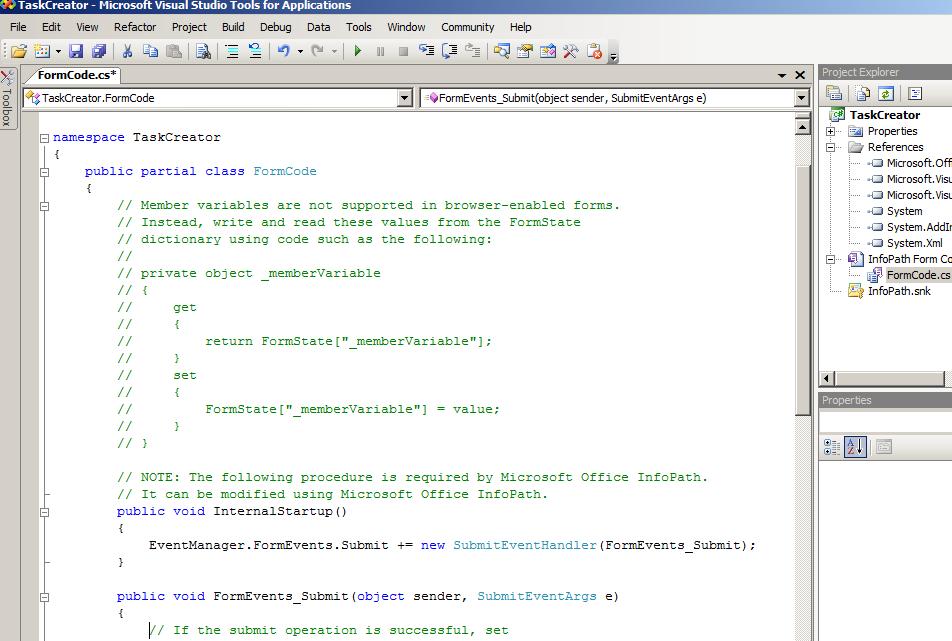
Press Edit Code. Save the form if its prompted and then it will open VSTA -2005 Code for you in VS-2005 Environment,


Don’t do anything now just Save it, and if asked , press ok in the submit Options in Infopath Designer and Save the code .


5)Now Lets Convert Our Code in the VS-2008 Code.

Go to the Infopath Designer click on Submit Button and in Button Properties in Action Drop Down Choose Submit, and that’s it. We are now ready with coding work. Save The Form.


Close the VSTA , VS 2005 project, do copy the directory path of it, and open then open VS-2008.Or Just Change the Location of the Project and then open it in VS2008, It Will ask you to Upgrade the Project, Please do that and that’s it we are done with it.
It Will Get Upgraded, Now Close The Project.


* Save  Form as Source Files:
Next, we will Extract the Form Source Files and save it in a Folder as “Infopath Form Template” Open the Form in Infopath Designer 2007, Go to File then choose Save as Source Files.


NOTE: Please Do Follow the Same Name of the Folder as we have choosen.

Now Copy that Folder and Place in the Project that we upgraded above at root.

* Open the Project in VS 2008.Open the project again and “Click show all files”, then you will be able to see Infopath Form Template folder, include the folder in the project.


Rebuild The Project, and you can see pdb and dll created in the same folder.

If .pdb files are not created then check if the Project is in Debug mode and Debug Config should Be Full.

For this , go to Project Properties, their select “Build” and from there choose Advanced option in the lower right corner, and in output for Debug Info Change Drop Down Value to full, see below:


Save the Project and Now we are ready with the upgrade and its finally a Infopath Form SharePoint Compatible VS-2008 Project. You can now see that VS 2008 contains all Designer Menu Items and Options.

Data Source and rest of Properties are enabled in the same VS2008,

Open Manifest.xsf file in Infopath Form Template Folder, so here we have over Designer Enabled here in you can see the form right there in VS2008.:


Go To Second Part of this Blog to see how to do coding  with this  to achieve our Case Study.

  • It Contains a Manager Name Text Box(We will use it for Naming the Form), as per logic it contains name of manager who will assign multiple tasks to his associates.
  • "Assign Action Item" Check Box, If Checked then our repeating table will get appear and manager can create multiple Tasks in it , it will look like this:

Thursday, May 26, 2011

LINQ to Sharepoint 2010.

LINQ (New Data Access Paradigm), when i hear it for the first time, i was sitting in a seminar and dotnet geeks were giving long lectures on it.It will make developer's life more easy.....

LINQ is a new data access paradigm which allows users to express SQL like syntax against a variety of data sources. LINQ can improve performance by allowing the back end data source to decide the best way to solve the query.
Was Amazed when used it in 2007 days for filtering CAML returned data.

CRUDQ options were allready there for maiking things good for us. but still there was something easy to implement was missing.

And finally with 2010 Microsoft given us LINQ to SharePoint.
Namespace Microsoft.SharePoint.Linq.

For people who are wondering , what is the use of it when we have CAML and more things availlable.

So for those the answer i have is its very fast, Even perform all CRUDQ options, you can bring data from multiple List and as well its very easy to write and intelliscence support we have for gettting the column names and more of the things for which we struggled alot in past looking deeper in internal names of the columns ows_xyz...

SharePoint now fully supports LINQ for querying lists so that you can query information from the platform in a more condensed, easier to understand format.


SPMETAL, the new command line utillity we have for providing the basic structure for LINQ.

In this Post i will be sharing my own experience of working with it and using LINQ to SHAREPOINT.

Writing LINQ queries are very easy but tricky things comes with SPMETAL generated code and how to use SPMETAL utillity and usage of Parameters.xml as parameter file in the command line and as well the way of utillizing the data fetched by LINQ query on EntityList.

First we will take the brief on how LINQ does the Processing(building CAML in the background and then we will come to SPMETAL and way to create the code using Parameter.xml and also i will take the case what if some fields doesnt appear the code file,how to do hard fixing(the term i normally say) )

Next i will explain, how to query with scope recurssive when querying Document Library for Folders.

In the end i will explain how to bind the data to a GridView with Template Columns to the Ienumerable list of data returned by LINQ query.